How to Pair a Ceiling Fan Remote
Using a remote to operate your ceiling fan makes it easy to adjust the fan speed and direction as needed. This convenient feature also allows you to make those adjustments from anywhere in the room without needing to get up and go to a wall switch or reaching for the fan chains…that’s a win-win in our book!
First and foremost, ALL remotes and Hunter fans that come in the box are already paired. Customers installing new fans and their accompanying remotes do not need to worry about pairing the two since that step is already completed for you. Trying to do so can create new problems.
The only times you’ll need to pair a remote with your fan are if you lost the remote it came with or your adding a remote to a fan that previously did not have one. Then, all you need to do is learn how to install a receiver and how to pair a Hunter fan remote with your ceiling fan, and you’ll be all set.
Tools Required
Installing a receiver and pairing a remote is relatively simple and only requires a handful of basic tools:
- Phillips head screwdriver
- Wire cutters
- Step stool or ladder
- Voltage meter
- Wire nuts
- Batteries for the remote (see the remote manual for battery requirements)
You’ll use these tools to install the remote receiver so you can then pair the remote control with the fan.
It’s important to understand there are two main aspects of remote installation. First, you must install the remote receiver if you do not have one in place already. Then, you can pair the ceiling fan remote with the receiver to enable remote operation.
If you’ve never used a remote to control your fan, you’ll need to start from the first step and install the receiver, but if you already have a receiver in your fan, you can skip to pairing the remote to it. We’ll show you how to complete the receiver installation and remote pairing every step of the way.
Follow the detailed steps below to get your Hunter fan set up with remote control capabilities. Please note, if you are uncomfortable wiring your ceiling fan remote receiver at any point, consult with a professional, certified electrician.
Install the Fan Remote Receiver
We’re often asked, “can I use a remote with a ceiling fan with a pull chain?” and the answer is yes, you can install a receiver on a fan with a pull chain, and then pair the receiver with a remote. The receiver is what allows the remote to communicate via transmitter with the fan, which allows you to operate it from anywhere in the room. So, before you can pair those two elements, you’ll need to install the remote receiver into your fan if there’s not one there already. Once you go through this process, you’ll operate the fan using the remote and you won’t use the pull chain any longer, as it could create issues with the fan and limit performance.
Follow along step-by-step to get started:
- Set the fan speed on high and turn the light on using your fan’s pull chains. Leave the pull chains in this configuration permanently to avoid interfering with the remote/fan functions.
- Turn the power to the electrical outlet box off.
- Using a step stool or ladder if needed, remove the canopy screws from the fan’s canopy using a Philips screwdriver.
- Identify the wires coming from your fan, control receiver, ceiling bracket, and ceiling fan rated electrical box. You can use a voltage meter to confirm the correct breaker was switched off and electricity is not flowing to any wires you’ll be touching. Remove the wire nuts from all wires except the grounding wires.
NOTE: The grounding wires are the three green, green/yellow stripe, or bare copper wires coming from the ceiling fan rated electrical box, the downrod attached to your fan, and the ceiling bracket.
- Use a wire nut to connect each of the following:
- Connect the three white (grounded) wires from the ceiling, fan, and receiver together.
- Connect the black wire(ungrounded) from the ceiling to the black wire (ungrounded) from the receiver.
- Connect the blue wire (ungrounded) from the fan to the blue wire (ungrounded) from the receiver.
- Connect the black wire (ungrounded) from the fan to the yellow wire (grounded) from the receiver.
NOTE: All wires, even if not connected to another wire, should now be capped with a wire nut.
- Turn all the wire nuts upward and push the wires up into the ceiling electrical box, being careful to place the ungrounded wires on one side of the box and all remaining wires on the other side.
- Slide the receiver into the opening with the vents facing downward and use the screws to secure the canopy back in place over the receiver. Refer to the illustration in your owner’s manual for placement.
- Install the remote control battery:
- Use a Philips screwdriver to remove the screw securing the remote control’s battery door.
- Ensure the batteries are installed properly. Coin Cell (CR2032) style batteries should be inserted with the positive (+) side up and AAA batteries fit in the proper direction using the positive (+) and negative (-) guides in the battery compartment.
- Replace the battery door and secure it with the Philips screw.
NOTE: Some older-style remote controls may require a different battery type. Refer to the owner’s manual for details.
How to Pair a Ceiling Fan Remote
Once you’ve installed the remote receiver, you can pair your remote with the fan. Use the following instructions and video to learn how to pair a Hunter fan remote with a Hunter ceiling fan using few general steps. Then, find model-specific directions for more specialized support.
Basic Steps on How to Sync a Hunter Fan Remote
Now that you’ve got your receiver installed, you’ll need to pair it with the remote so the two pieces can communicate. This connection will let you use the remote to turn the fan on and off, adjust the fan speed and direction (if applicable), and turn the ceiling light on and off (if your fan has a light).
Carry out these steps to pair your remote with your receiver:
- Expose the pair button on your remote by removing the battery door on the back of the remote.
- Cycle power to the fan.
- Turn off power to the fan using the wall switch or circuit breaker.
- Leave it off for a minimum of 10 seconds.
- Turn the power back on using the wall switch or circuit breaker.
- Press and release (don’t hold down) the pair button on the remote within three minutes of cycling power to the fan. You should hear a beep confirming the successful pairing.
NOTE: Hunter’s remote control pairing function utilizes a ‘toggle’ command, which means the same function is used to both PAIR an UNPAIR the controls. Therefore, if the remote transmitter (fan receiver were previously unpaired, this function will pair them and if they were previously paired, this function will unpair them.
These are the basic steps for the pairing process, however specific instructions may vary by fan model. Find your Hunter ceiling fan series and model below for more details.
Pairing a Remote Control with Specific Hunter Fan Models
Most Hunter brand fans produced since 2016 are '5' Series Fans, while older models are typically'2' Series Fans. For help finding your model number, see: Where can I find the model number on my fan?
Jump to: Pairing '5' Series Fans | Pairing '2'Series Fans
Pairing a ‘5’ Series Model Hunter Fan
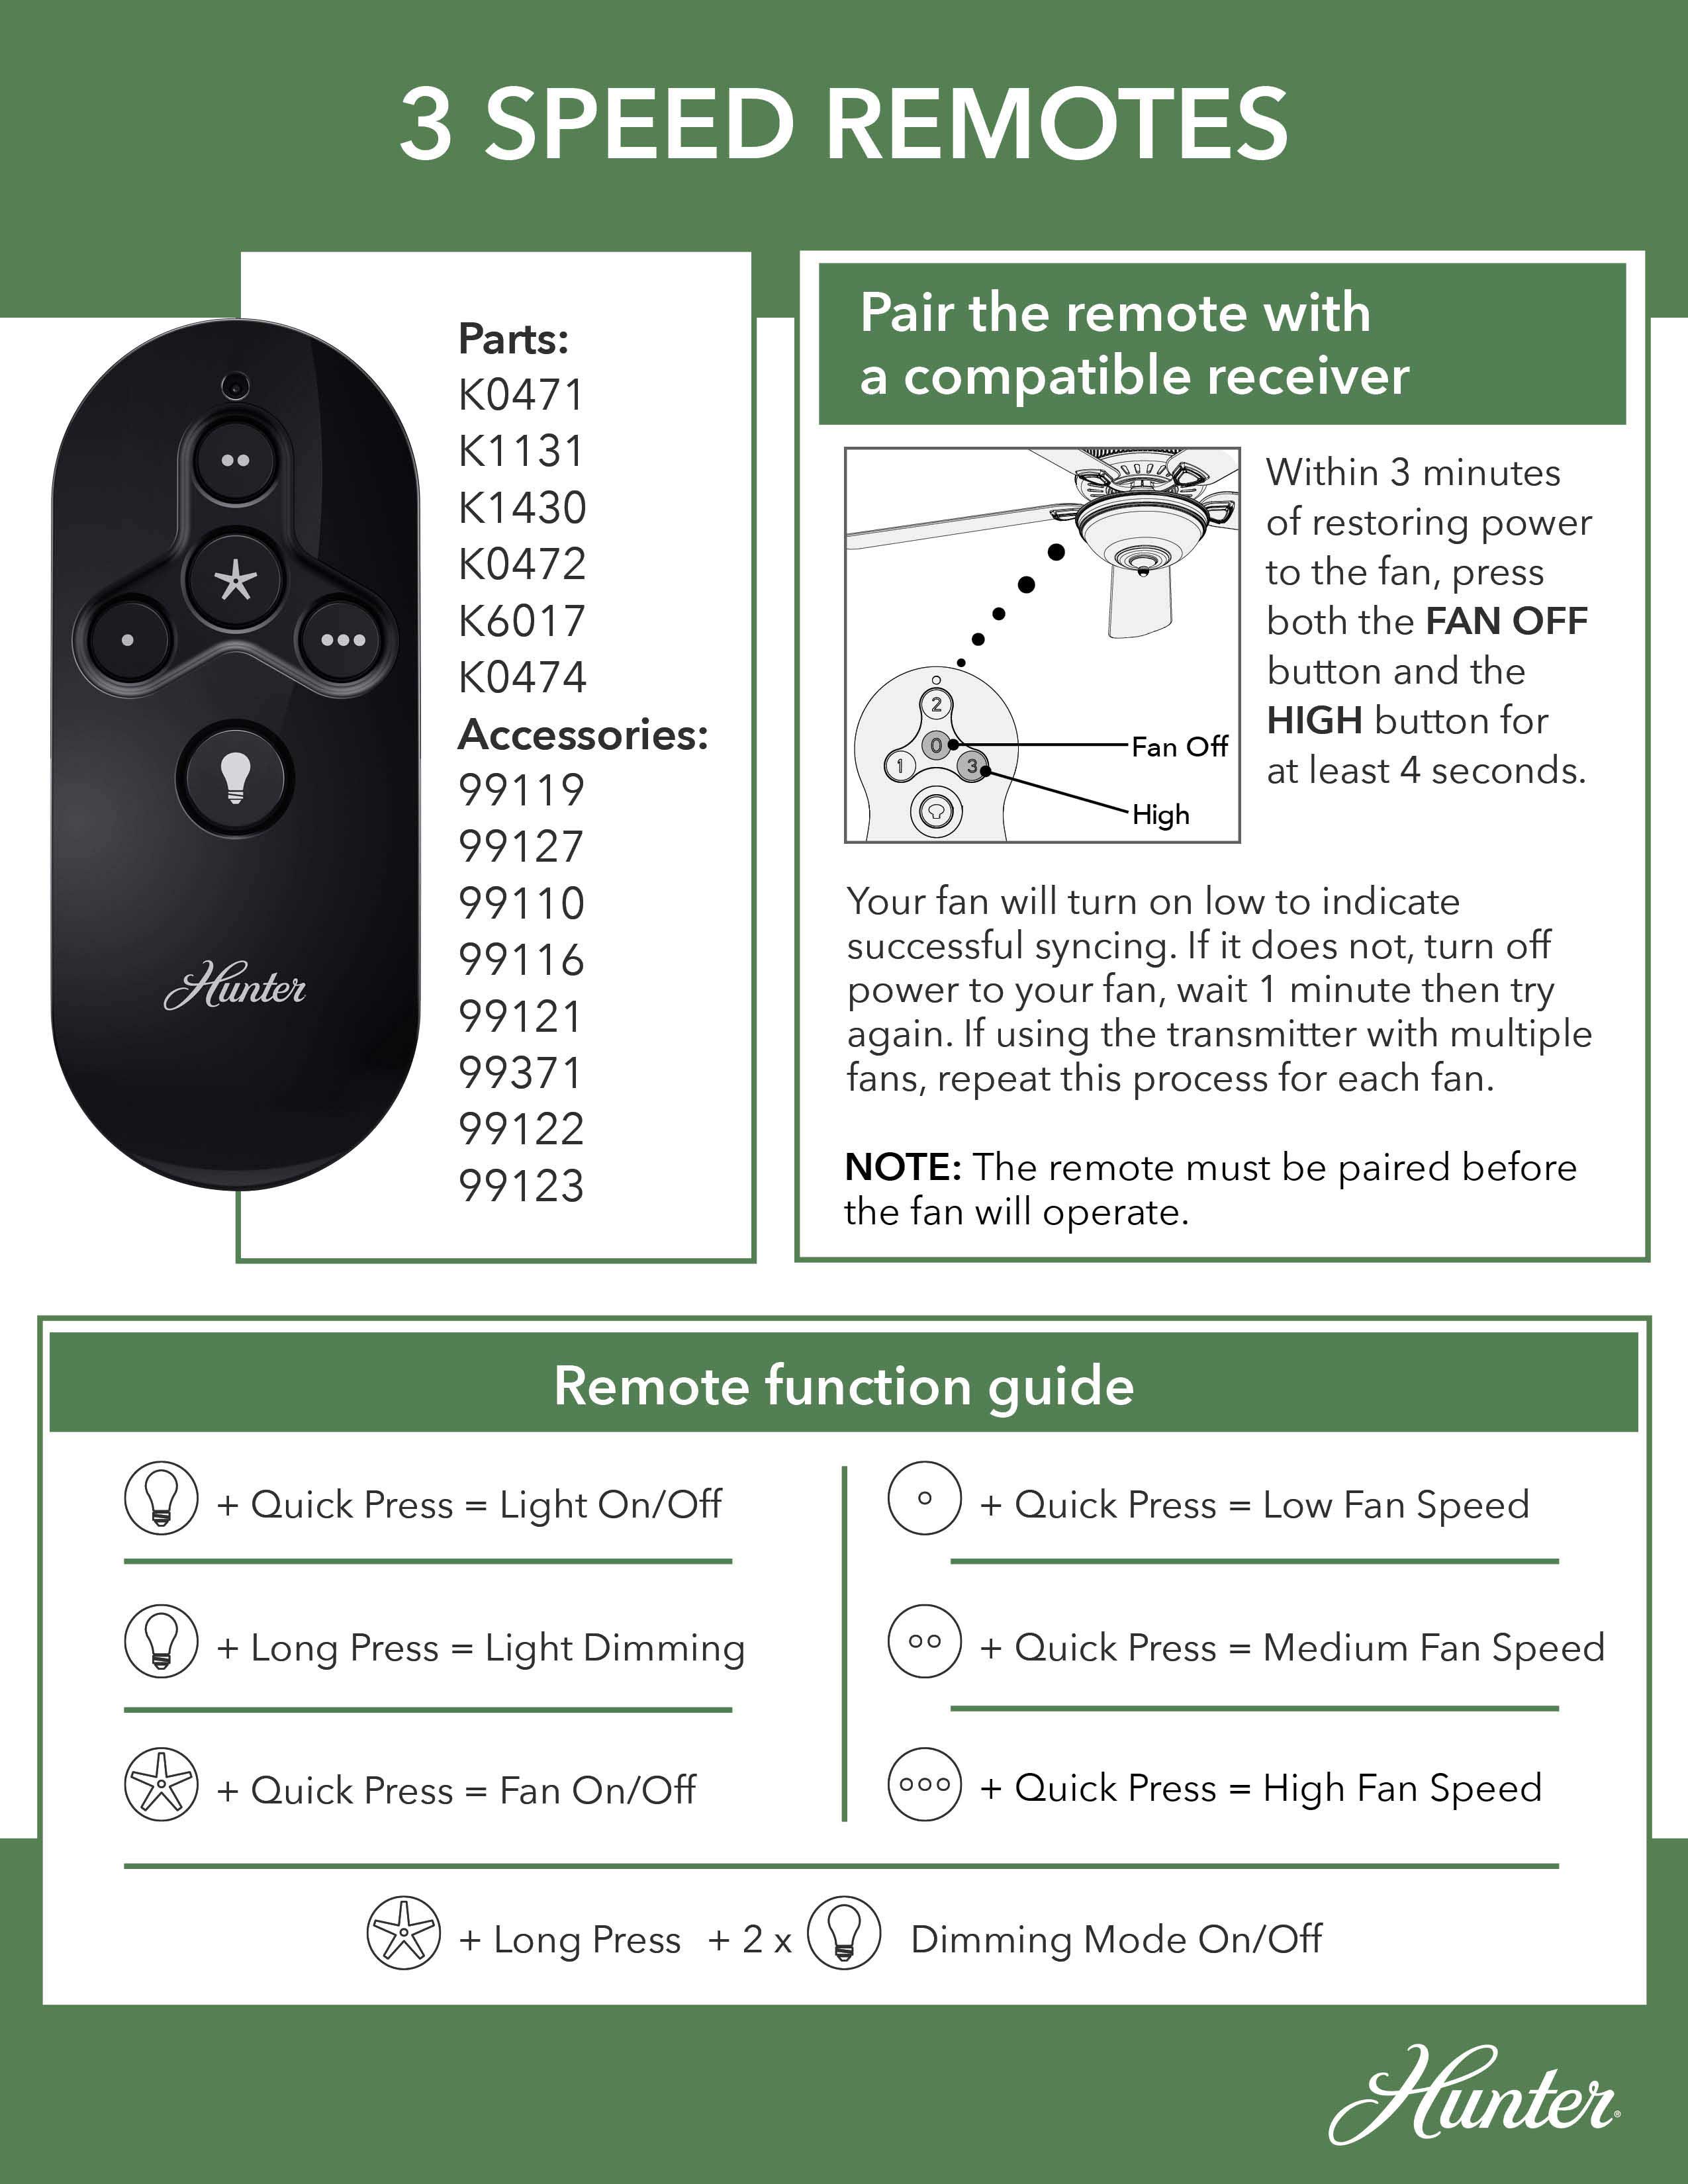
Remote Model Numbers: 99371/k6017, k532401000, k5323, 99116/k140302000, 99110/K113101000, 99122/99123/k0474010000, and 99199/99127/k047101000

- Using the wall switch, turn the power to your fan off for at least 10 seconds to ensure the control has enough time to properly power down. Then turn the power back on.
- Press and hold both the ‘FAN’ button and the ‘SPEED 3’ button for at least four seconds. This step should be done within three minutes of restoring power to the fan.
- If previously unpaired, the remote and receiver will now pair. The fan will set to low speed. Light will blink 3 times and stay on.
- If previously paired, the remote and receiver will unpair. If running, the fan will turn off. The light will blink twice and turn off.
NOTE: If the pairing is unsuccessful, turn the power to your fan off at the wall switch, wait one minute, and then try again.
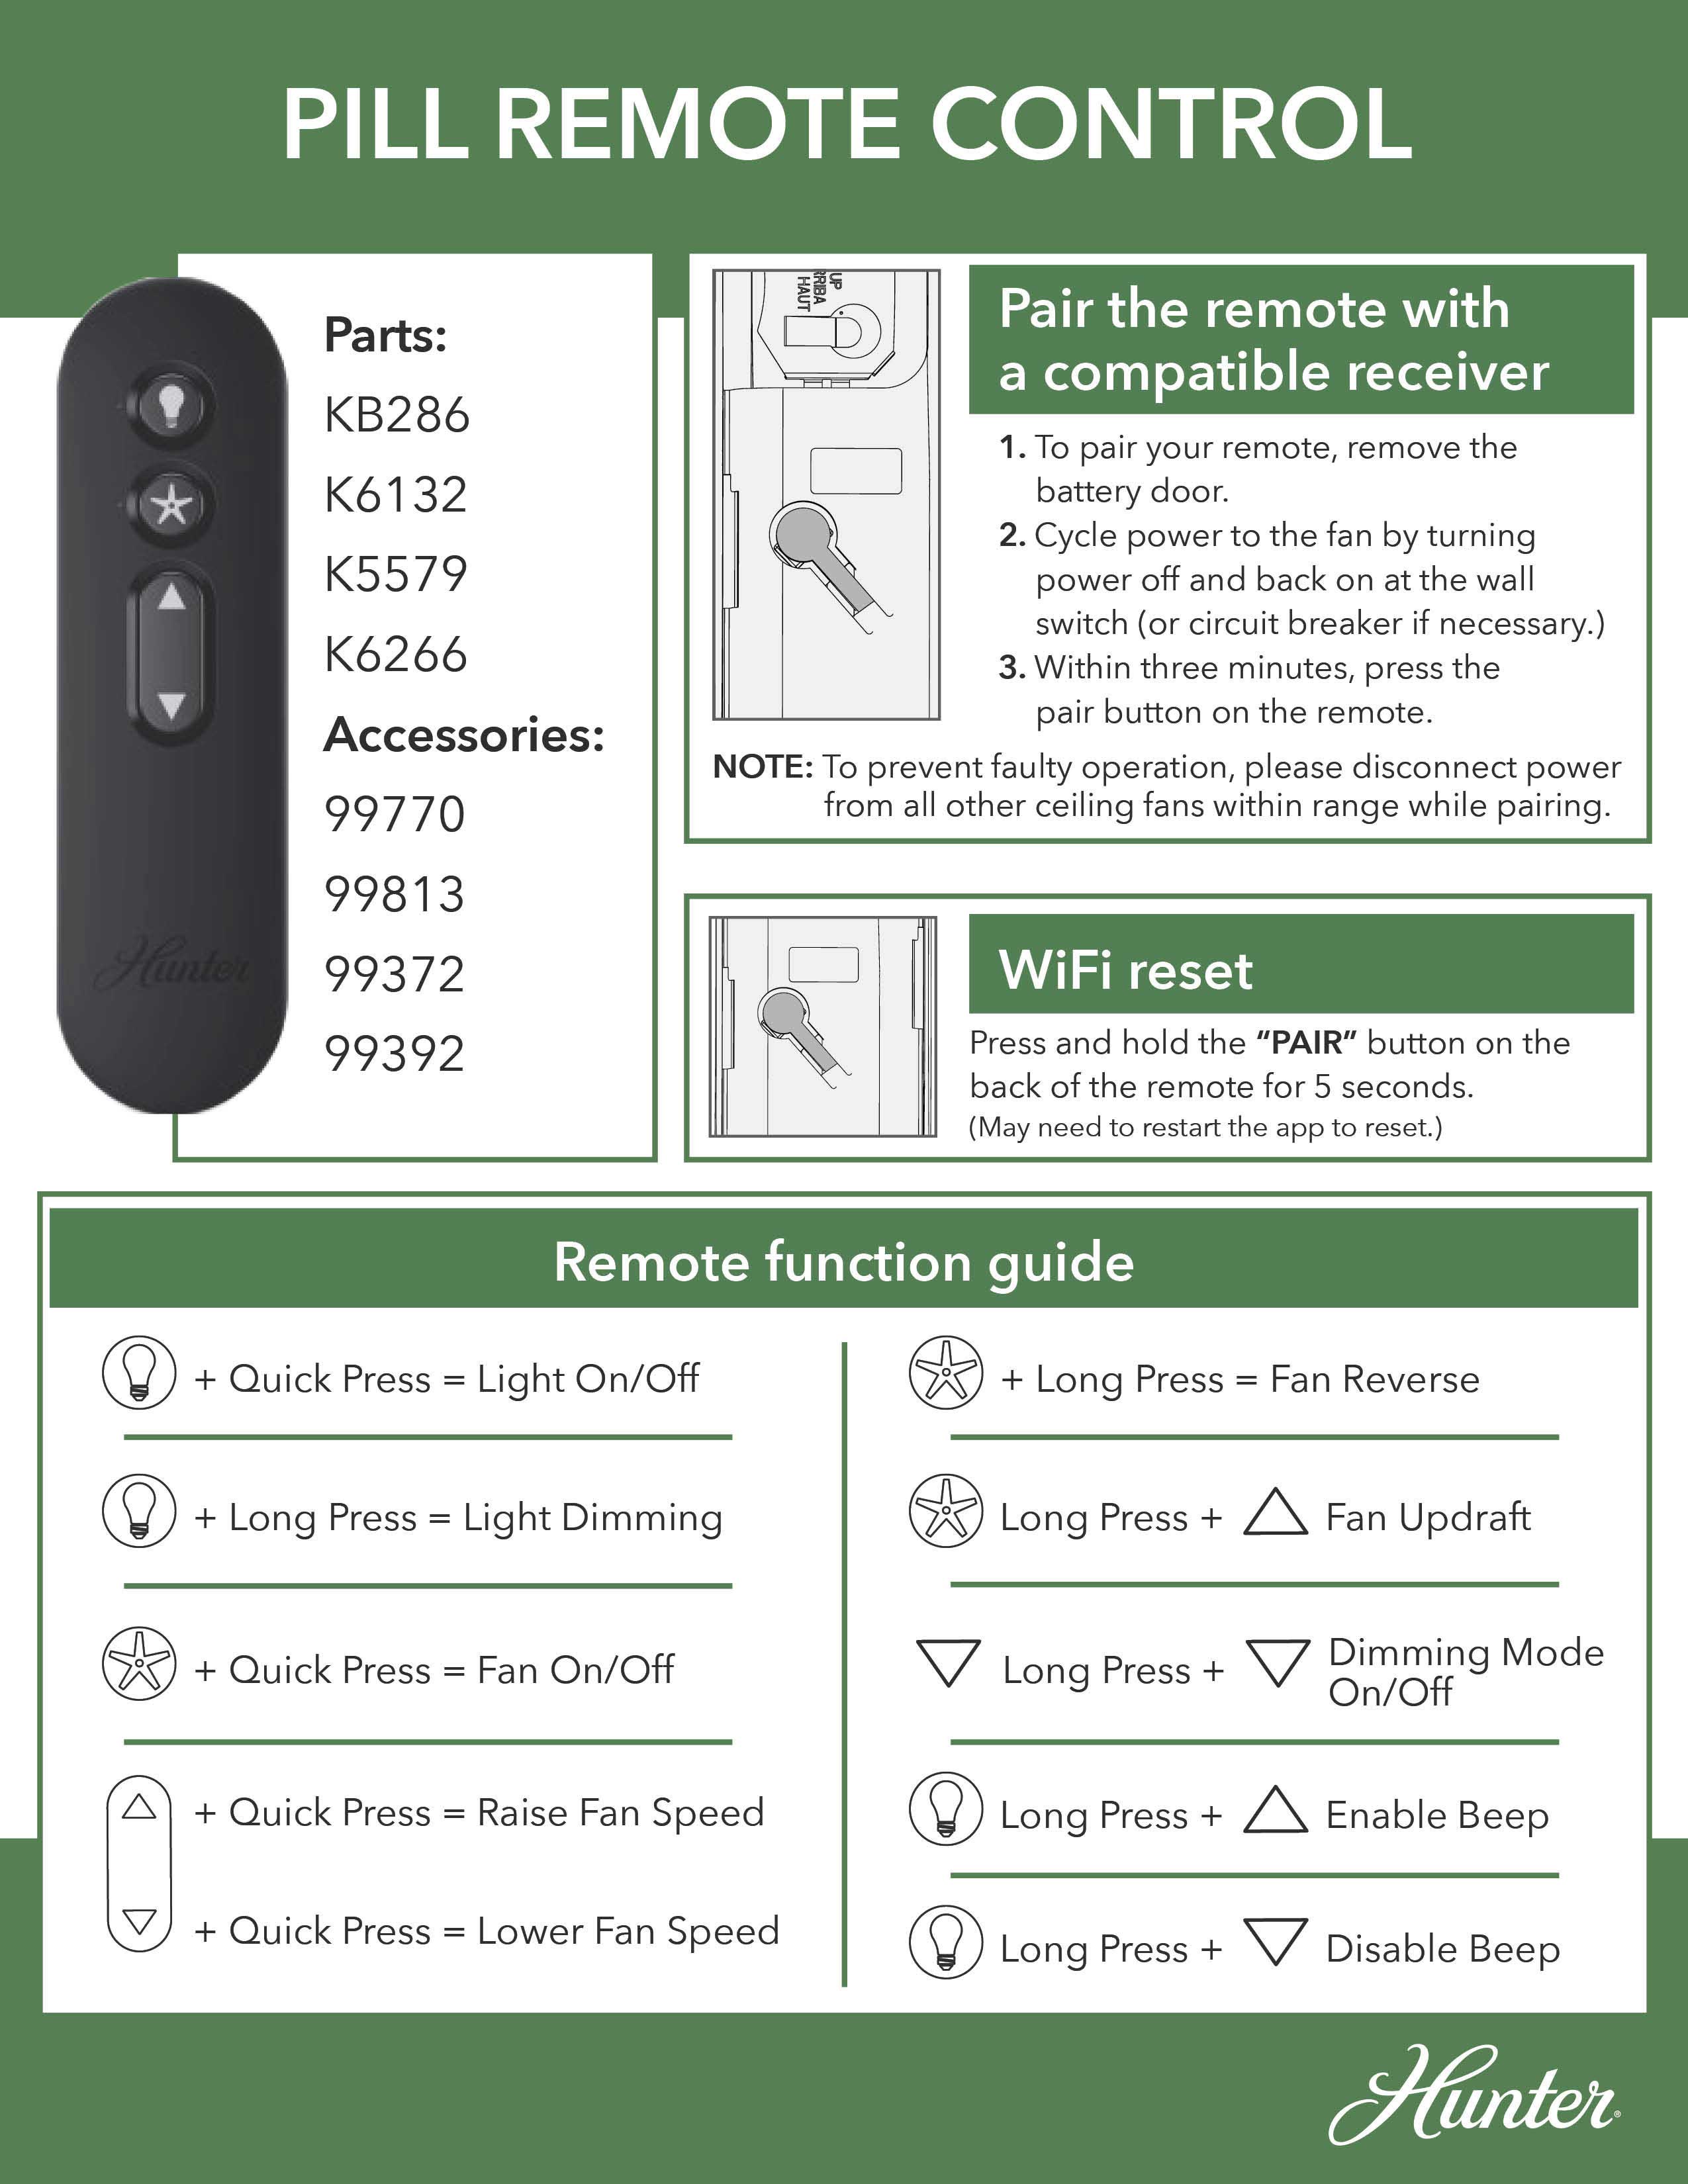
Remote Model Numbers: k626601000/k626602000, 99372/k6019, k5579010000, and 99198/k6266-03

- Using the wall switch, turn the power to your fan off for 5-10 seconds and then back on.
- Quickly press and release* the ‘PAIR’ button on the back of the remote control. This step should be done within three minutes of restoring power to the fan.
- If previously unpaired, the remote and receiver will now pair. The fan will set to low speed. Light will blink 3 times and stay on.
- If previously paired, the remote and receiver will unpair. If running, the fan will turn off. The light will blink twice and turn off.
NOTE: If the pairing is unsuccessful, turn the power to your fan off at the wall switch, wait one minute, and then try again.
* The button must be pressed and released to send the pair command. Holding the PAIR button sends a different command to reset the Wi-Fi and will not affect pairing the remote.
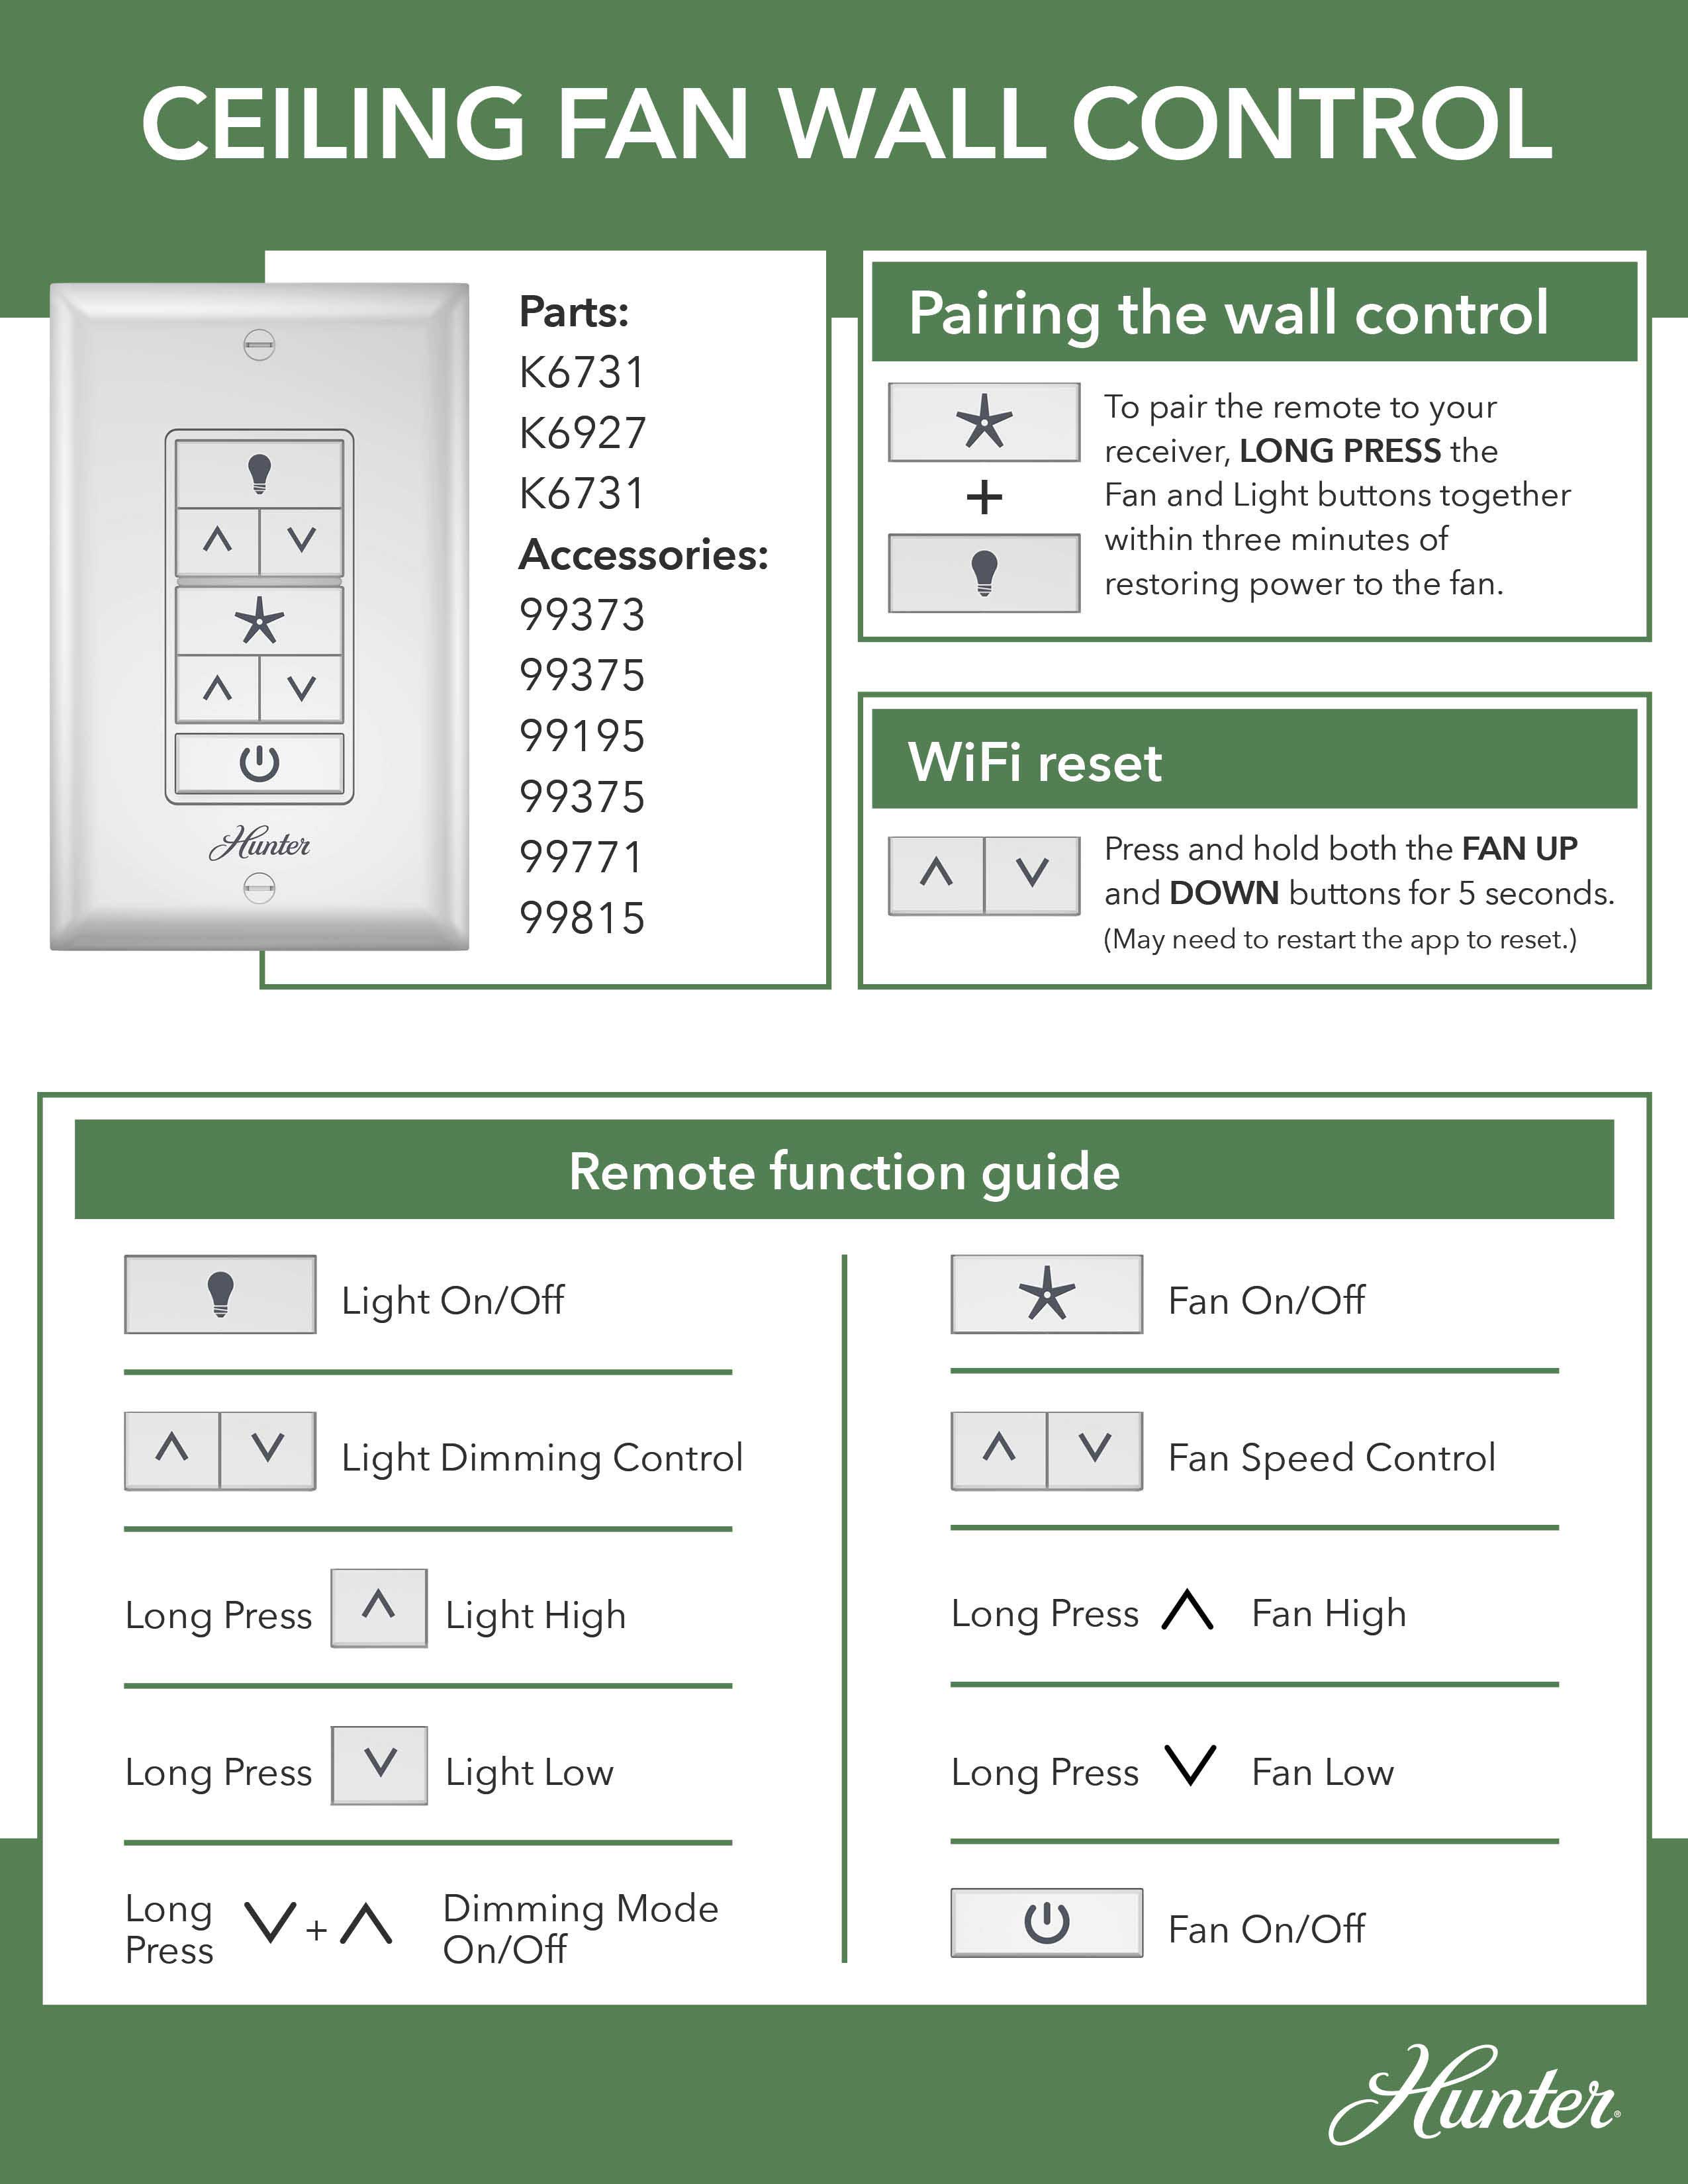
Remote Model Numbers: 99370/k6018 and 99112/k113301000

- Using the wall switch, turn the power to your fan off for 5-10 seconds and then back on.
- Press and hold both the ‘FAN’ and ‘LIGHT’ buttons for at least four seconds. This step should be done within three minutes of restoring power to the fan.
- If previously unpaired, the remote and receiver will now pair. The fan will set to low speed. Light will blink 3 times and stay on.
- If previously paired, the remote and receiver will unpair. If running, the fan will turn off. The light will blink twice and turn off.
NOTE: If the pairing is unsuccessful, turn the power to your fan off at the wall switch, wait one minute, and then try again.
Pairing a ‘2’ Series Model Hunter Fan
- Turn the power to your fan off at the wall switch or circuit breaker.
- Remove the batteries from the remote control
- Change the Dip switches on the remote transmitter and the receiver ensuring they both match. (Not all receivers have Dip switches.)
- Restore power to the fan and re-install the batteries in the remote control.
- Press and release the three HIGH (3), MEDIUM (2), and LOW (1) buttons on the remote control at the same time. This step must be completed within 30 seconds.
- Check your fan is successfully paired by turning the fan and lights on and off with the remote control.
A new outdoor fan is an easy update to enhance the style and comfort of your outdoor oasis, but there’s one technical factor you need to pay attention to when choosing an outdoor fan: the rating.
We have three different types of outdoor ceiling fans depending on where your space is located, from covered patios to pergolas in areas that see harsh weather.
How to Install a Ceiling Fan Remote Cradle
Installing a cradle helps you keep track of your remote when it’s not in use. It acts as a docking station so you’ve got easy access to your ceiling fan remote whenever you need it.
Over the Wall Switch Plate
- Remove the two screws from the wall switch plate, but do not remove the switch plate from the wall.
- Align the two holes in the cradle with the two holes in the switch plate
NOTE: If your switch is rocker style, remove the cradle tabs by pushing outward so the cradle will fit properly.
- Use the screws to fasten the cradle to the wall switch plate, being careful not to overtighten.
- Slide the remote into the remote control cradle.
Using an Adhesive Strip
- Remove the cradle from the cradle bracket.
- Peel the lining from the adhesive strip on the cradle bracket.
- Press the cradle bracket against the wall and hold firmly for 30 seconds.
- Slide the cradle back into the cradle bracket.
Using Screws
- Remove the cradle from the cradle bracket.
- Drill two 9/64 width holes using the cradle bracket holes as a guide. Gently hammer the included drywall anchors into the pre-drilled holes.
- Fasten the cradle to the wall using the supplied screws.
- Slide the cradle back into the cradle bracket and slide the remote into the cradle.
Now that you know how to pair a Hunter ceiling fan remote, you can enjoy the convenience of operating your fan with ease. Explore our selection of ceiling fans with remotes to find the latest models available in a range of styles and sizes. And if you need a replacement control part or want to upgrade your existing fan with a remote and canopy kit, shop our ceiling fan controls to find the right fit.